
Today, I wanted to discuss the different parts of brewing process step-by-step with a little explanation of each. I’ve added in some diagram and visuals in the hope of making the whole process easier to understand.
So, we will go through the main steps of the brewing process. As well as which brewhouse vessel it takes place in, depending on your set-up. The most common brewhouse set-ups are:
2 Vessel System – A combined mash/lauter tun + combined kettle/whirlpool
3 Vessel System – A mash tun + lauter tun + combined kettle/whirlpool
3 Vessel System – A combined mash/lauter tun + kettle + whirlpool
4 Vessel System – A mash tun + lauter tun + kettle + whirlpool
We will take a quick look at the merits of each setup at the end of the article but, to be honest it deserves its own post.
Brewing Process Step-By-Step – The Stages
To help with the brewing process I’ve made a little flow chart (see below) of the various steps you need to go through to make beer. It also shows where the four main ingredients (water, malt, hops and yeast) are added during the process.
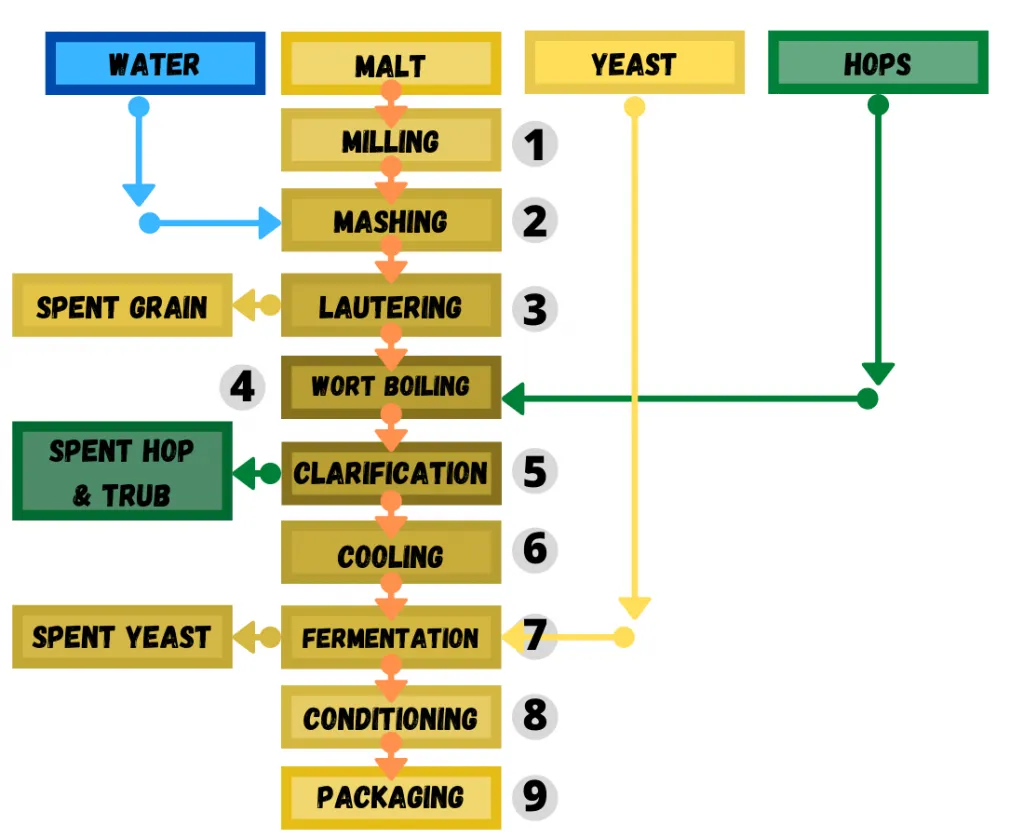
Milling
To make beer we need sugar, we get it from malted barley. The fermentable sugars needed are contained inside the husk of the kernel. It’s actually starch at this point. We need to crack open this husk to expose the starch for conversion.
When looking to order a mill for brewing, it’s best to get one with adjustable rollers. This way you can control the crush of the malt. The reason being is when malt is crushed too fine it leads to a stuck mash. Making it hard to collect the malt sugar liquid (wort) to the next brewing vessel.
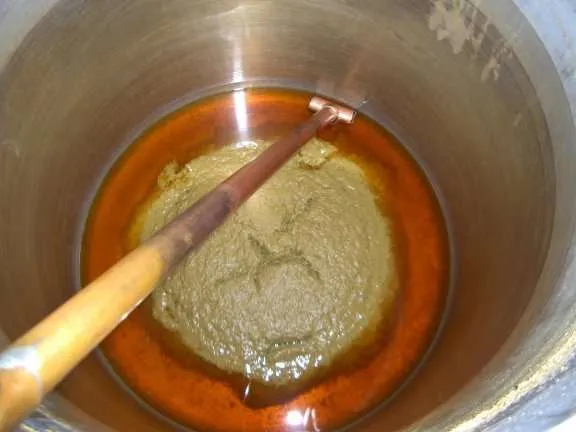
Mashing – Brewing Process Step-By-Step
Mashing is where you mix your milled malt and hot water to allow the starch in the grain to convert to fermentable sugars. The mashing process, if done at one temperature is called an infusion mash. Its typical in British ale brewing taking place at around 65°C.

The mash is then held 65°C at for an hour, which allows the malt sugars to be released from the grain by action of the enzymes in the malt. However, with some beers its best to perform a step mash. In a step mash, the temperature of the mash bed is raised, allowing the different parts of the starchy endosperm to be broken down.
Proteases at 35°C–45°C (95°F–113°F): Breaking down the protein matrix holding the starch granules.
Glucanases at 45°C–55°C (113°F–131°F): Breaking down the hemicelluloses gums.
Amylases at 61°C–67°C (141.8°F–152.6°F): Break down the starch granules and bigger sugar molecules into fermentable sugars.
Before lautering you usually “mash out”, meaning raise the temperature of the mash to about 77°C (170°F). This stops a lot of the enzymic activity.
Lautering
With lautering you spray fresh hot water (called liquor in brewing) on to the mash to rinse out the residual sugars. If you don’t rinse, many of the sugars will be left behind in the malt. Furthermore, lautering allows you to achieve good extraction efficiency.
Please note: Before lautering you need to recirculate the wort through the grain bed to clear it. This is called the vorlauf. It’s best to have clear wort going to the brew kettle.

When lautering you want to match your inflow of water with outflow of wort. If your too slow putting water in; you’ll dry out the mash bed. Too quick and you mash will overflow; they both lead to issues on your brew day and can affect your efficiencies.
Wort Boiling – Brewing Process Step-By-Step
The boil is a key process in brewing, and a lot happens here, such as:
Boiling stops enzymatic activity – The mash out does a good job of stopping the enzymes but boiling is the nail in the coffin. It allows you to have fixed wort composition in your fermenter (FV).
Sanitizes the wort – If you’ve ever smelt spent malt a few days after a brew, it stinks to high heaven. Lactobacillus loves malt and hence the smell. Boiling your wort eliminates unwanted microbes, leaving a clean beautiful wort for the yeast to do its thing.
Hops = Bitterness – Hops contain alpha acids which give bitterness to beer. You need to boil hops in the wort to isomerize the alpha acids in the hops. By isomerization the alpha acids become “iso-alpha acids”, which are more soluble and so easier impart their bitterness.
Boil off Volatiles – When malting barley, it creates a compound called s-methyl-methionine (SMM). SMM is a precursor to dreaded dimethyl sulfide (DMS), which imparts corn like aroma and flavor to beer. A good boil drives off SMM and hence less chance of DMS in your final beer.
Boiling coagulates proteins – When you boil it encourages wort proteins to combine with tannins and form clumps. During the boil these clumps get bigger and eventually become big enough to fall out of solution.
If you want to learn more about what happens in the boil then please read our dedicated article on “Brewery Boiling Tips – Kettle Reactions“.
Clarification
There are two points in the kettle where proteins coagulate. One is the “hot break” which happens at the start of the boil, you might see it as scum forming on top of the wort.
Then there’s the “cold break”; when the wort is rapidly chilled on the way to the FV, and looks a bit like Miso soup. Furthermore, in most modern breweries, brewers’ “whirlpool” after the boil as well. This helps clear the wort too.
When brewers’ whirlpool, wort is pumped very fast creating well…a “whirlpool”. It allows the hops and trub to form a cone in the center of the kettle/whirlpool. Which is left behind when you pump the wort out of the kettle to the FV from a point above the trub cone.
Cooling – Brewing Process Step-By-Step
The wort is hot after the boil and in need of cooling so, yeast can be pitched. The now clear wort is sent via a heat exchanger to the FV. The wort is “flashed cooled” as it passes through the heat exchanger to 7 to 35°C depending on beer style.
The heat exchanger works by cold water and/or glycol passing one side of the exchanger. While the wort passes on the other side, the two liquids never come in contact. But the water takes the heat away from the wort.
Fermentation
The first stage of fermentation; known as primary fermentation, happens after the beer has been brewed. Once the wort has been cooled and sent to FV, you pitch your yeast. The yeast after a “lag phase” becomes active and starts feasting on all those lovely sugars.
As the yeast feasts away they create alcohol and carbon dioxide. As the sugars convert to alcohol the liquid goes from sweet to more resembling finished beer.

Furthermore, depending on the yeast used, some flavor compounds called phenols and esters make their way into the beer. Esters are like the banana (isoamyl acetate) in your Hefeweizen and phenols like clove (4-vinylguaiacol) in Belgian wheats.
After 5 to 7 days the fermentation will have slowed down considerably, as the yeast has gorged itself and slowing down. The used-up yeast will start to drop to the bottom of the FV, along with hops, proteins and other solids.
During this time, you can dump some of the solids which have gathered at the bottom the FV. However, don’t dump too much as you will lose some of the precious yeast.
In 7 to 10 days, the fermentation is likely finished, although some beer styles take longer. It’s time to chill the beer, to help drop out more yeast and solids. Once the beer is chilled, the yeast may be collected for “repitching” in another brew, or dumped. The beer is now ready for conditioning.
Please note: You can spund during the fermentation process, I won’t explain it here as I’ve done a full article on the subject, which you can read here.
Conditioning – Brewing Process Step-By-Step
Maturation time allows beer had to mellow out. I’m not sure how to approach this one as all brewers are different. For example, some brewers like to get their IPA’s out fresh while others like to give their IPA’s a few days to “mellow out and settle down”.
Easiest way to explain conditioning is with lager brewing. Lager comes from the German word “to store”. Traditional German lagers are stored to “mature” for 3 to 4 weeks. In traditional lager brewing, after primary fermentation (in FV) the beer is moved to a maturation tank.
Where the beer stored at 32 – 39.2°F (0 – 4°C); maturation allows for the haze-inducing proteins and polyphenols to coagulate and drop to the tank bottom. Furthermore, during this time the beer mellows becoming more delicate.
Please note: After conditioning and before packaging beer (depending on style) beer can go through a process to clarify it. To make the beer “brite”. Clarification is done by fining, filtering or centrifuging the beer.
Packaging
Once the beer has been matured and optionally cleared, it’s ready to package. If you opt to clear the beer, it’s usually been moved to what we call a brite tank. The beer goes through some checks to make sure it’s in specification.
The possible checks are many; however, the main ones are:
DO (dissolved oxygen) – When beer is high in DO, shelf life is compromised, which can lead to wet cardboard off-flavors
CO2 – You need to check the beer is properly carbonated to style, to learn more read here.
Micro – Make sure no nasty bacteria is present.
Color and bitterness – Can check to make sure color and bitterness are in specification
As for the actual packaging here are some issues to look out for:
Low fills – Make sure you’ve no low fills it can impact beer flavor and be against the law to sell low fills.
DO pick up – Make sure when packaging, to reduce the chances of oxygen ingress.
Properly sealed – Make sure cans are properly seamed, the bottles are properly crowned and all kegs are safely sealed, with no leakage from the spear detected.
And there you have it; the brewing process step-by-step with the beer ready to drink. The above is simple breakdown of all the processes.
It’s a lot more complex, books have been written on every step of the process. This was just to act as an introductory guide. The next step is to show you, where each process happens depending on your setup.
The Breakdown of Different Brewhouse Setups – Brewing Process Step-By-Step
Your brewhouse set-up will determine in which tank, each step will take place. Let’s look at table below to explain to explain more clearly.
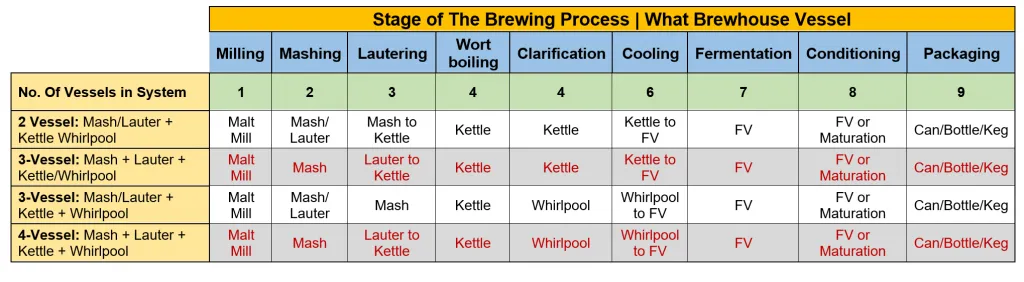
2-Vessel System – Combined Mash/Lauter Tun and Combined Kettle/Whirlpool
This is a very popular choice for brewpubs and people who want to open a brewery on a budget. The mashing and lautering are all done in the first vessel and moved to the second one for boil and whirlpool.
If space is a premium, this setup is ideal. However, if you’re doing multiple brews per day, it’s hard work. You have to wait till the sparge has finished and the mash is dug out, before you can begin the second brew.
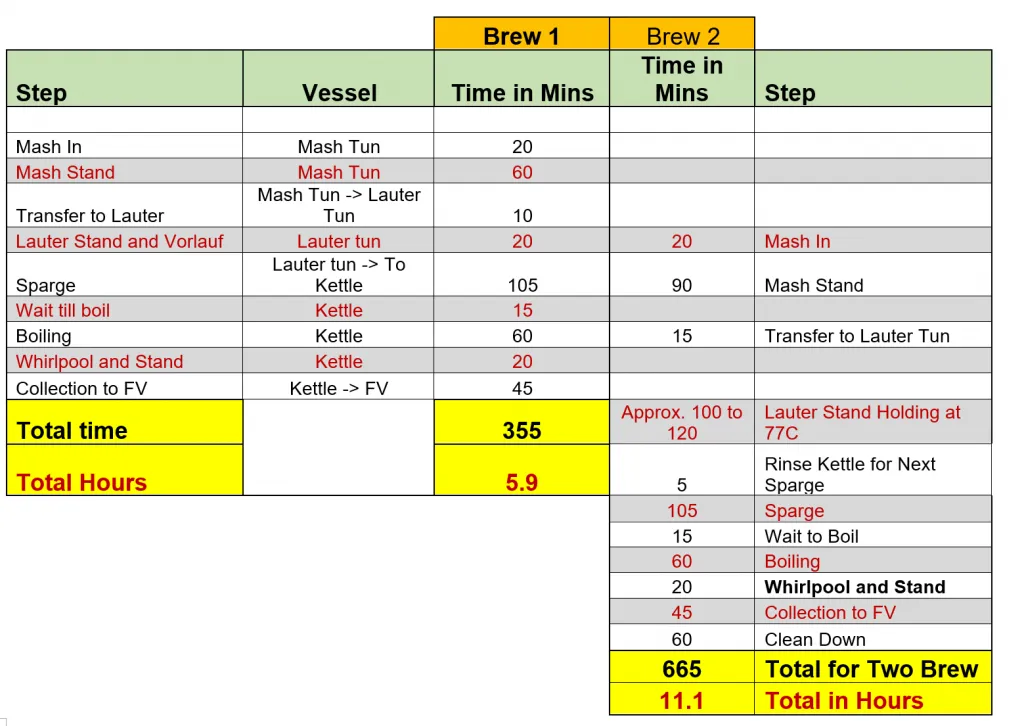
To give you an idea of how a brew day might work on a 2-vessel system. I did this for a diagram for a client recently who was looking for a semi-automated 2-vesels system.
The main issue with a 2-vessel brewhouse is it’s hard to expand on. If you’re brewery gets popular and you need to brew greater volumes per month, having 2-vessels only is restricting.
3-Vessel System – Mash Tun + Lauter Tun + Combined Kettle Whirlpool
This is a very popular choice for people looking at a 3 vessels system. It easier to brew more than one brew per day when compared to a 2-vessel system. As having a separate mash and lauter tun, means once the mash has been moved to the lauter tun, you can begin the next mash.
See the table below for a hypothetical two brew day on this setup.
3-Vessel System – Mash/Lauter Tun + Brew Kettle + Whirlpool
This 3-vessel configuration is the choice of most experienced brewers. This brewhouse setup allow a brewer to do multiple brews per day more quickly than with a separate mash tun and lauter. Here’s an old post on LinkedIn I posed about the subject. As you can see brewers prefer this setup (see the comments).
4-Vessel System – Mash Tun + Lauter Tun + Brew Kettle + Whirlpool
Well, this is good for multiple turns a day if designed right. As Fraser in the LinkedIn post (Ex-AB InBev brewer) said:
4 vessels = no worries ;)
Fraser Kennedy, Ex-AB InBev Brewer now actually a distiller
This set up and gives your brewery plenty of scope. However, for many craft brewers the money might be best spent elsewhere when getting setup.
Is it better to spend the money on some more automation on a 3-vessel system rather than spend it on the extra brewhouse vessel? Many brewers would say yes.
Brewer like some automation, as it helps with consistency of your beer, making recipes more easily repeatable.

Other Set-Ups
I’ve seen brewhouse set-up with 5 and 6 brewing vessels with multiple mash tuns. This allows a brewery to do several turns a day. This is beyond the reach of most craft brewers, especially when starting out.
Brewing Process Step-By-Step – Conclusions
I’ve been a brewer for 25-years, people like to call me a master brewer, but I’ve never been comfortable with this term. There is always more to learn and I’ve picked a lot myself, since I set up Asian Beer Network and started writing articles.
What I’m trying to say is there’s always more to learn in brewing, and whatever you level…keep trying to understand more.
I hope this post on the brewing process step-by-step allowed you to understand some of the basic principles better. I wanted to do something a little different, adding some visuals to the post to try and make the process easier to understand.
As ever, if you’ve some follow-up questions and/or feedback, please feel free to send me an email at:
Or you can add me to preferred network by scanning the relevant QR code below.
I’m a brewing consultant based in China and help people with their brewing projects. I first came to China in 2010, and have built up useful network of brewing industry contacts, I can utilize on your upcoming project.
I’ve brewing for 25 years, have experience on a number of systems from brewpub to production brewery and done my fair share of brewhouse installations…I like to think I know my way around a brewhouse.
Many people are now looking to buy brewing equipment from China and for those who are, I can be your man on the ground using my local experience to help you. So, please feel free to reach out and tell me about your project.


